In this article, I want to talk about the creation of a custom score using the app “Predictive Studio”. It’s the step-by-step guide for creating scores using HANA Studio, SAP Marketing GUI, SAP Marketing Web, including technical aspects.
Task: to estimate the probability of clients’ leaving (outflow) based on a list of criteria (availability of checks for the last 11 months, availability of an actual service order, availability of complaints for the last 11 months, availability of a pre-entry at a service station) using a score.
Step 1. Copying and extending of a standard procedure.
A procedure is further used as an implementation method for a calculation of a score, in our example it’s an HRF (Hana Rule Framework) procedure. Path:
system-local.sap.hana-app.cuan.cpred.reuse.internal/PR_PRED_HRF_EXEC.
1. Go to File – Export in HANA Studio and select Developer Mode (pic.1):
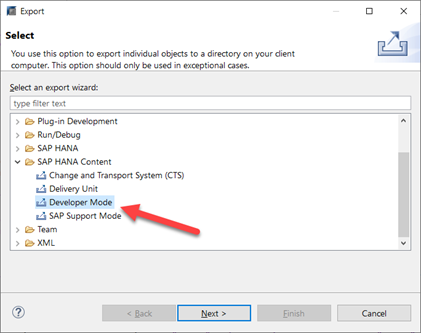
Picture 1 – Export of the procedure
Select the system from which the procedure will be exported.
Select the path to the procedure (1), click Add (2) and select Target folder (3).
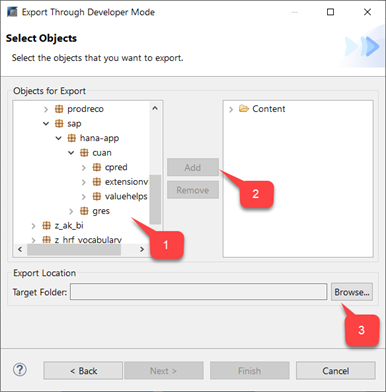
Picture 2. Select objects
Open the procedure in app Notepad++, change id and defaultDescription of the procedure to ZPR_PRED_HRF_EXEC. Save the edited procedure.
2. Import the procedure back into the system.
Go to File – Import – Developer Mode.
Select the system for import.
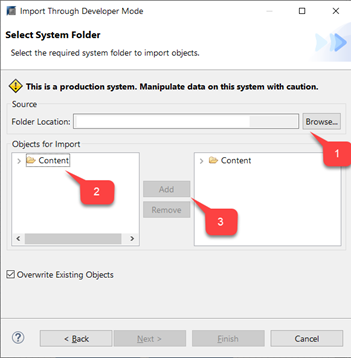
Picture 3. Select the procedure
Specify the path to the saved procedure (1), from the left work area (2) add it to the right area (3).
The procedure must be activated in the repository after the import (picture 4):
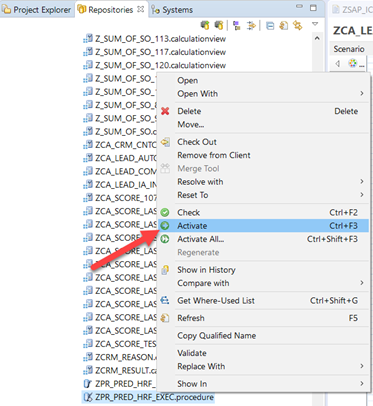
Picture 4. Activation
Step 2. Copying and extending of a table function
A table function takes a key place in the calculation of the score and the previously created procedure ZPR_PRED_HRF_EXEC is called in it.
We’re using the table function for HRF-score in this example.
Path to the standard table function: sap.hana-app.cuan.cpred.ic_scoring.scn.internal/TF_CA_SCORE_EMAIL_AFFINITY.
1. Export the procedure as above.
2. In Execute model, where the procedure is being called, specify the path to the procedure ZPR_PRED_HRF_EXEC. Example of the path:
call "_SYS_BIC"."z_hrf_vocabulary.custom_vocabulary.vocabulary.internal/ZPR_PRED_HRF_EXEC"
3. Import the procedure ZTF_CA_SCORE back into the system.
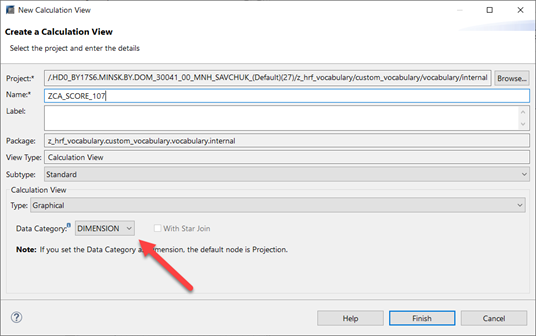
Step 3. Creating a view with a reference to the table function
1. Create a view using data category Dimension.
Picture 5. The view
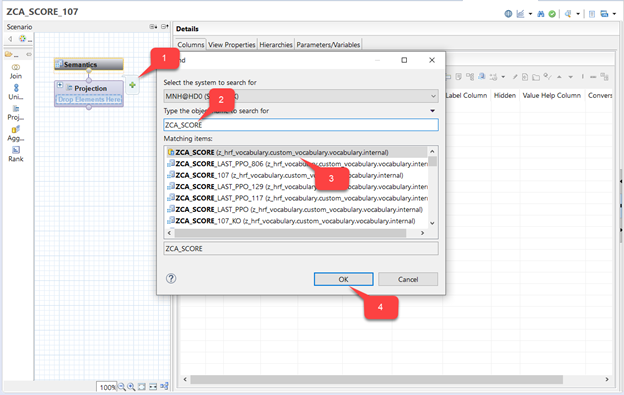
2. In Projection, add the previously created table function ZCA_SCORE.
Picture 6. Adding the table function to the projection
3. Turn on the display of all specified fields.
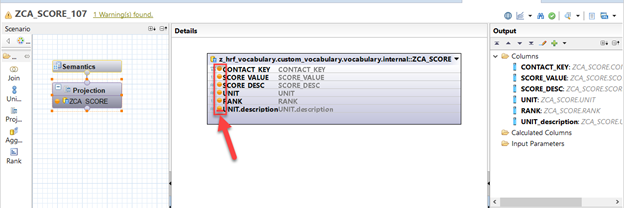
Picture 7. Fields
4. Click Semantics. On View Properties tab, change the data category to CUBE.
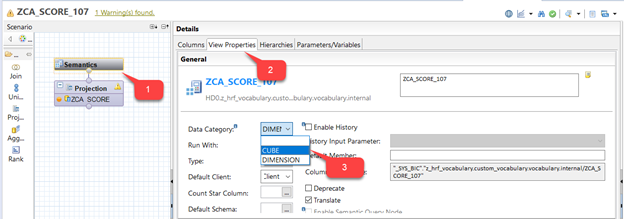
Picture 8. Changing the data category
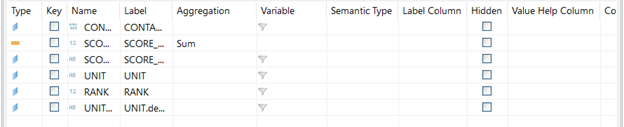
5. The above action will allow you to change the field type SCORE_VALUE to Measure.
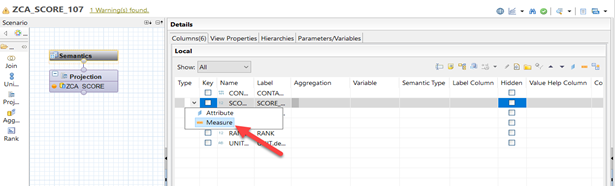
Picture 9. Changing the type of field
6. Activate the view.
Picture 10. After activation
Step 4. Extending of interactions and customer data views
In steps 1-3, we’ve created the view, the table function and the procedure for creating a predictive scenario. Next, we need to create calculated fields that will be used in the creation of the score in the application “Prediction Studio”.
1. Create a view based on 3 Projections with tables CUAND_JS_CONTACT, CUAND_CE_IA_RT, CUANI_PM_DYMMY. In the table CUAND_CE_IA_RT, turn on the display of fields which will be used in formulas for calculations above.
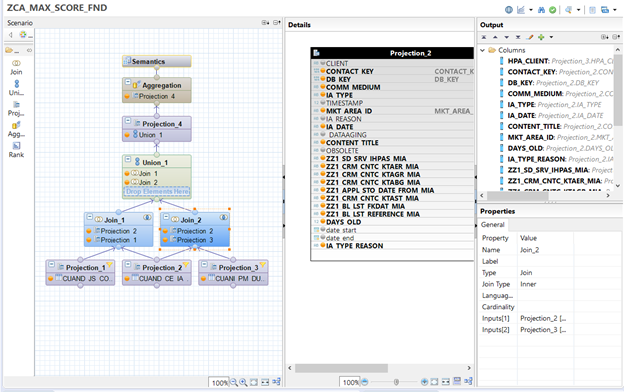
Picture 11. The view with calculated fields
2. Configure fields’ mapping in Union_1.
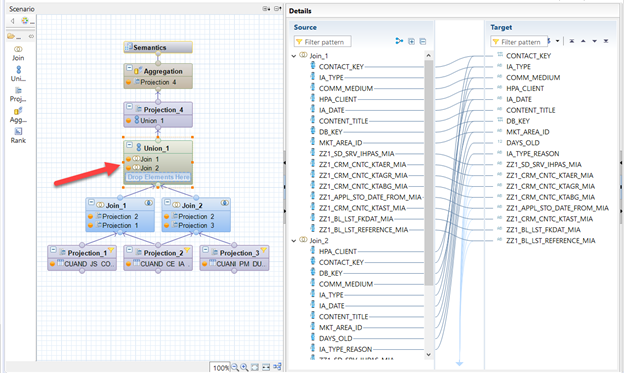
Picture 12. Mapping
3. Create calculated fields in Projection_4 using formulas:
- availability of checks for the last 11 months (NO_OF_BL_LST_LAST_MONTHS)
if("IA_TYPE"='CHEQUE' AND "CHEQUE_DATE" <=
format( now(), 'yyyymmdd') and "CHEQUE_DATE" >=
format((ADDMONTHS (now(), -11)),'yyyymmdd'), 1, 0)
availability of complaints for the last 11 months (NO_OF_COMPLAINT_FOR_LAST_MONTHS)
if("IA_TYPE"='COMPLAINT'AND"COMPLAINT_DATE" <=
format( now(), 'yyyymmdd') and "COMPLAINT_DATE" >=
format((ADDMONTHS (now(), -11)),'yyyymmdd'), 1, 0)
availability of a current service order (NO_OF_ACTUAL_SERVICE_ORDERS)
if("IA_TYPE"='SERVICE_ORDER', 1, 0)
availability of a pre-entry at a service station (NO_OF_UPCOMING_APPL_STO)
if("IA_TYPE"='STO_ENTRY'AND"STO_ENTRY_DATE" >=
format( now(), 'yyyymmdd') and"STO_ENTRY_DATE" <=
format((ADDDAYS (now(), 30)),'yyyymmdd'), 1, 0)
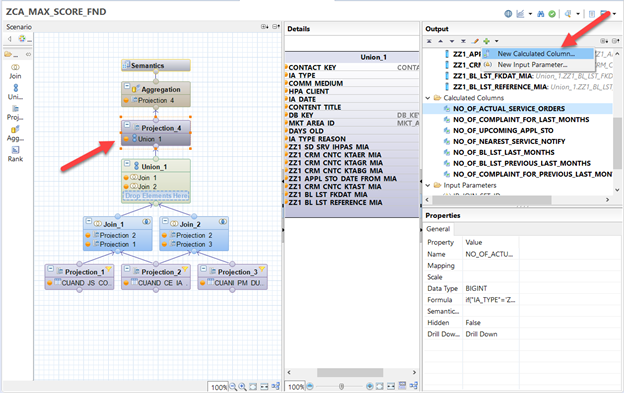
Picture 13. Creating the calculated fields
4. Calculated fields, as well as mandatory CONTACT_KEY, DB_KEY, should be displayed at the upper level of Semantics.
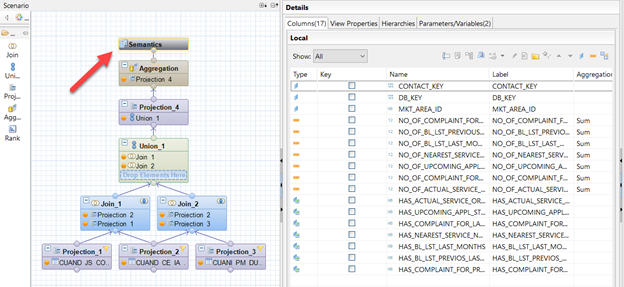
Picture 14. Semantics
5. The above view must be included in the view used in the information model (dictionary). Create a copy of the standard view CA_LEAD_IA_INTERESTS_FND and name it ZCA_LEAD_IA_INTERESTS_FND. Path:
sap.hana-app.cuan.cpred.datafoundation.internal. CA_LEAD_IA_INTERESTS_FND
In the projection, specify the view ZCA_MAX_SCORE and display the fields (which we will see later as attributes in the Predictive Studio application) at the Semantics level (Picture 15).
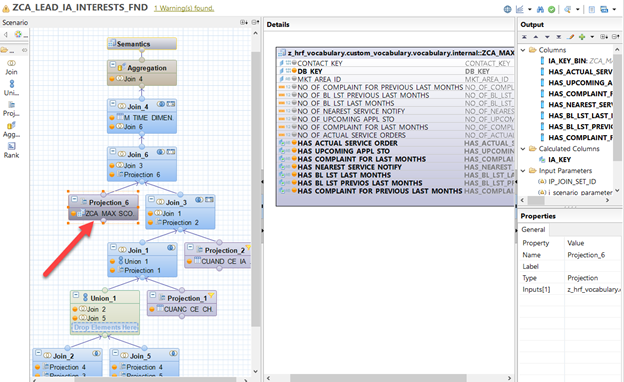
Picture 15. The final view
Step 5. Copying and extending a dictionary (information model)
After the view is created, it’s time to expand the information model. Make a copy of the standard dictionary along the path sap.hana-app.cuan.cpred.ic_scoring.SAP_IC_SCORING.
1. Open the dictionary ZSAP_IC_SCORING using “Text Editor” (right click – Open with – Text Editor).
2. Find the path to the standard view CA_LEAD_IA_INTERESTS_FND and replace it by ZCA_LEAD_IA_INTERESTS_FND:
"mappingInfo": {
"schema": "_SYS_BIC",
"name": "PATH TO ZCA_LEAD_IA_INTERESTS_FND ( placeholder.\"$$IP_JOIN_SET_ID$$\" => :JOIN_SET_ID , placeholder.\"$$i_scenario_parameters$$\" => :SCENARIO_PARAMETERS )",
"type": "CalculationView"
3. Above this block are a list of fields related to this view. Add new calculated fields using the pattern:
{
"name": "HasSTOapplication",
"description": "ApplicationSTO",
"valueList": "has_account_vl",
"dataMapping": {
"column": "HAS_UPCOMING_APPL_STO"
}
},
{
"name": "HasActualServiceOrder",
"description": "ActualServiceOrder",
"valueList": "has_account_vl",
"dataMapping": {
"column": "HAS_ACTUAL_SERVICE_ORDER"
}
},
{
"name": "HasComplaintLastMonth",
"description": "HasComplaintLastMonth",
"valueList": "has_account_vl",
"dataMapping": {
"column": "HAS_COMPLAINT_FOR_LAST_MONTHS"
}
},
{
"name": "NumberOfBillListLastMonth",
"description": "NumberOfBillListLastMonth",
"valueList": "has_account_vl",
"dataMapping": {
"column": "HAS_BL_LST_LAST_MONTHS"
}
},
where name – name of the created field (will be displayed in the application); description – description of the field; valueList – drop down list of values; dataMapping – technical name of a field in the view.
Note: this example uses a standard valueList with True / False values.
Step 6. Setting up a predictive scenario in SAP GUI.
The created view, procedure, and information model must be added to the predictive scenario, on the basis of which the score is created in the application.
Creating a predictive scenario should be done in SPRO (picture 16).
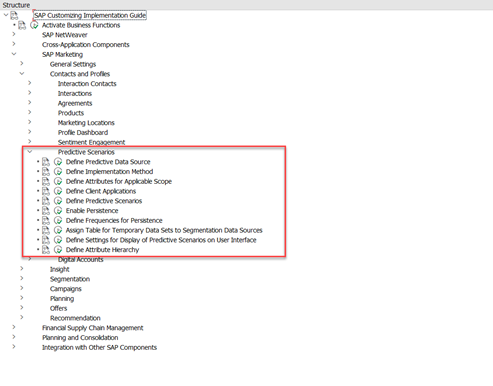
Picture 16. Configurations for a predictive scenario
1. Go to the setting “Define Predictive Data Source” and create a new data source, specifying the path to the dictionary ZSAP_IC_SCORING.
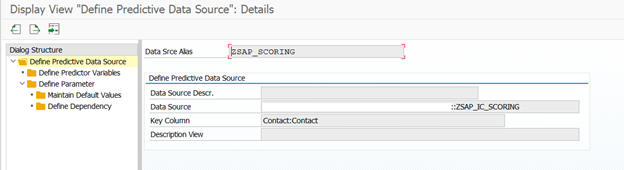
Picture 17. Data source ZSAP_SCORING
2. Go to the setting “Define Implementation Method” and create a new method. Specify the path to the procedure ZPR_PRED_HRF_EXEC, the data source ZSAP_SCORING and the method category SAP_HRF.
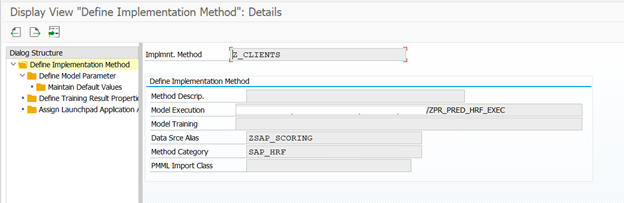
Picture 18. Implementation method Z_CLIENTS
3. Go to the setting “Define Predictive Scenario”. Create the new predictive scenario Z_CLIENT_SCORE.
- Specify the path to the view ZCA_SCORE_107_KO.
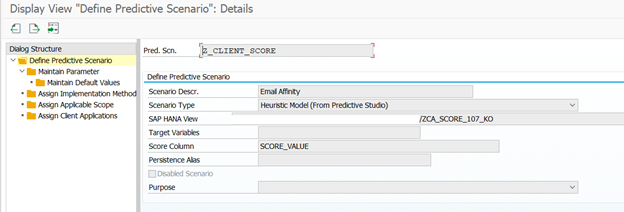
Picture 19. Predictive scenario Z_CLIENT_SCORE
- Assign the implementation method Z_CLIENT_SCORE to the predictive scenario.
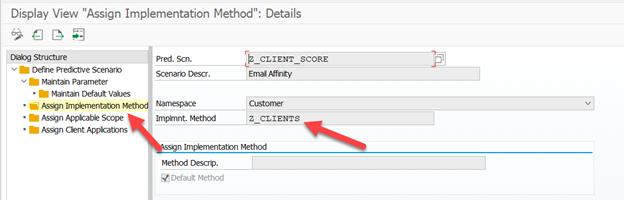
Picture 20. Assigning the method Z_CLIENT_SCORE
- Assign the applicable scope Z_CLIENT_SCORE (or a standard scope) to the predictive scenario.
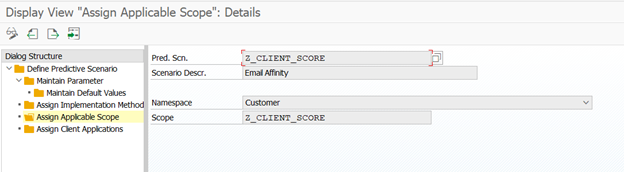
Picture 21. Applicable score Z_CLIENT_SCORE
- Assign client applications to the predictive scenario.
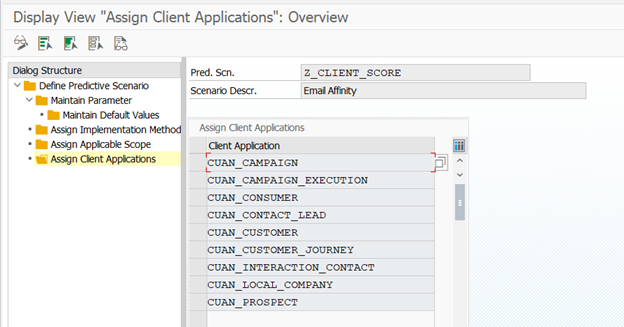
Picture 22. Assign Client Applications
The predictive scenario has been created.
4. Go to the setting “Define Settings for Display of Predictive Scenarios on User Interface”.
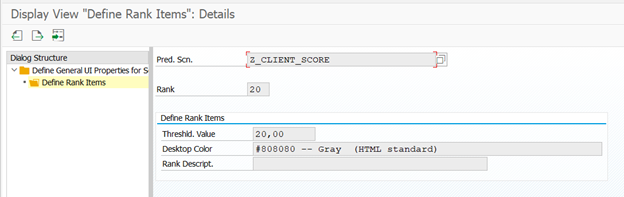
Create “Rank Items” for the predictive scenario.
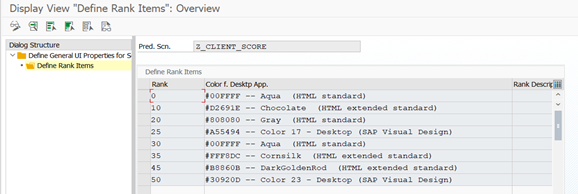
Picture 23. Rank Items
Each element of the class is given a threshold value and description. These threshold values should be used in creating scores in the application “Predictive Studio”.
Picture 24. Define Rank
Step 7. Creating the score in the app “Predictive Studio”(WEB)
1. Go to the application “Predictive Studio” for creating a new score. Specify Predictive Model (name) and Marketing Area.
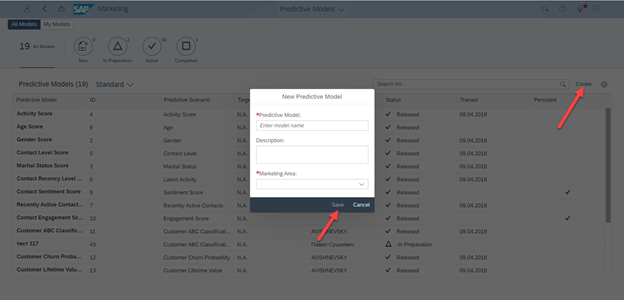
Picture 25. Creating the score
2. Select the earlier created predictive scenario “Probability of clients’ leaving” (1). Click “Preparation” (2) and “Add Custom Model” (3), then enter the model name and save it.
Picture 26. Selecting the predictive scenario and creating the model
3. Select the method of creating rules “Decision Table”.
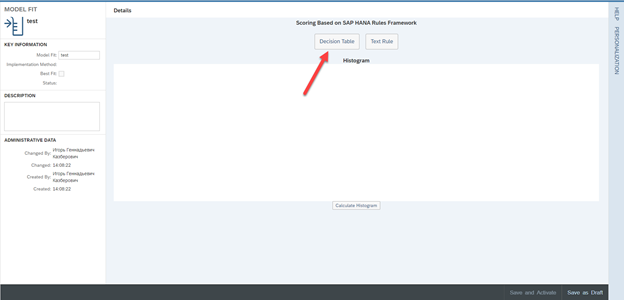
Picture 27. Creating of decision table
4. Go to the selection of attributes that will participate in rules. Add a list of fields, in the “Alias” column, specify the field names and click “Save”.
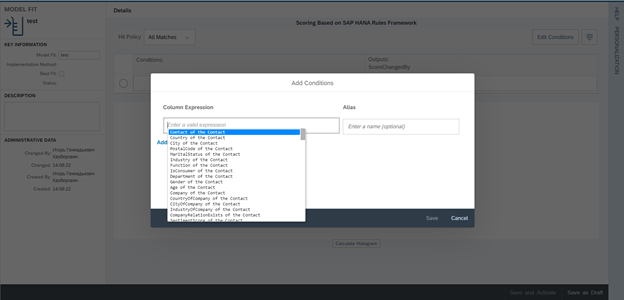
Picture 28. Selecting attributes
5. Set the conditions line by line in the corresponding columns, specifying a score in “ScoreChangedBy” (scores that will be set when the specified condition is met).
Earlier, we set the scores and their description (which will be displayed in a contact and segmentation profile) in the “Define Settings for Display of Predictive Scenarios on User Interface” setting.
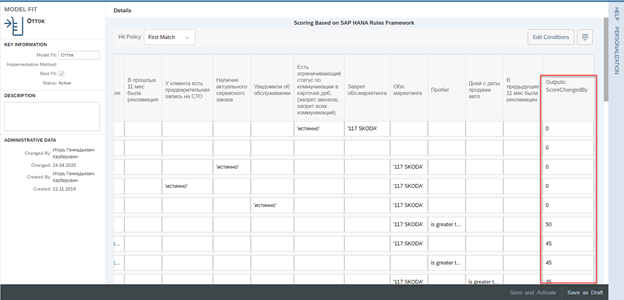
Picture 29. Creating conditions
6. Click “Save and Activate” after specifying all the rules.
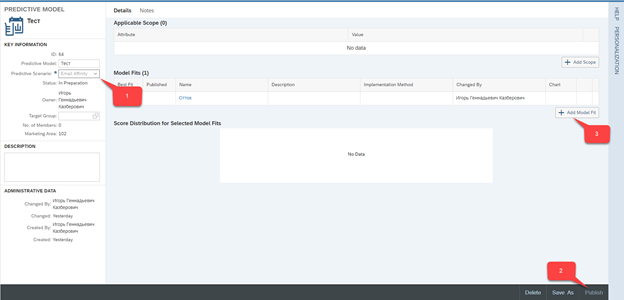
7. Select the created model as Best Fit and click “Publish” on the Predictive Model screen.
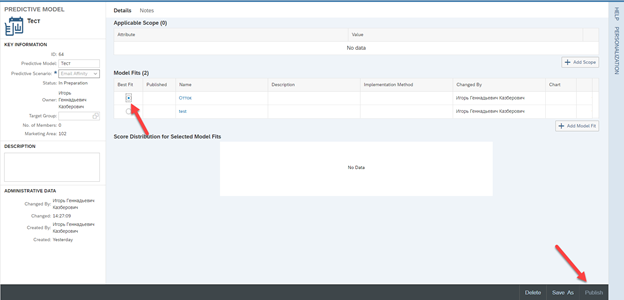
Picture 30. Publish
Step 8. Adding the view ZCA_SCORE_107_KO to the segmentation
1. Add the created view as a data source in the segmentation and set the “SCORE_VALUE” attribute from this data source to the output.
2. Add the data source to necessary segmentation profiles and attribute groups.
Author: Igor Kazberovich, SAP CX Consultant, ACBaltica.
Subscribe